
Are you finding that your featured image is not showing on the page?
With my checklist, you can identify why your featured image is not appearing.
In this post, I’ll walk you through troubleshooting and resolving the issue.
So, let’s get started and get your featured images back on track!
Did You Assign A Featured Image To Your WordPress Blog Post?
Here’s how to assign a featured image to your post:
Open “All Posts” on your dashboard and click the “Edit” button for the post you want to add a featured image.

Next, click on the “Featured Image” option on the right-hand sidebar of the editor.

Click the “Set Featured Image” button to choose an existing image from your media library or upload a new one to the post.

If uploading a new image to the post, click the “Upload Files” button and select the image from your computer.

Once you have chosen your post image, add relevant Alt Text and Title data to help search engines index your image.
Click “Set Featured Image” to assign it to your post.

Don’t forget to click “Update” to save your changes and publish your post with the featured image.

You can assign a featured image to your blog post with these steps.
Did You Enable A Featured Image On Your WordPress Theme?
The Astra, Ashe, and Kadence themes have options to enable featured images for blog posts.
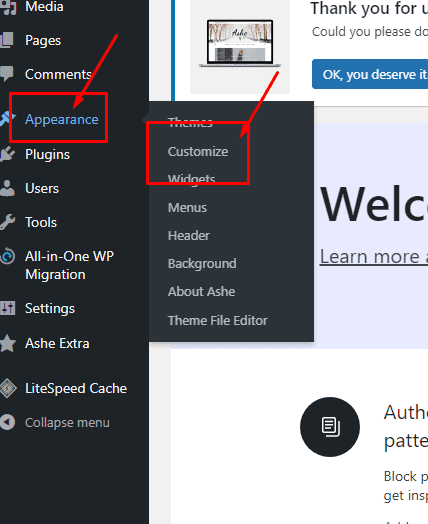
Hover your mouse over Appearance and click Customize to access the theme customizer.
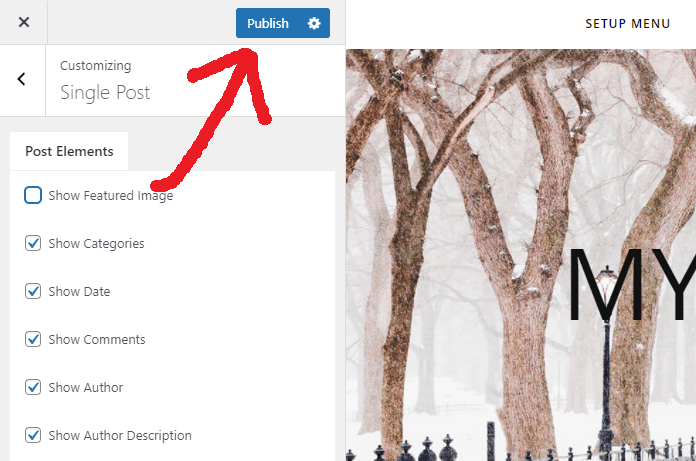
How To Enable Featured Images On Ashe
Select Single Post.

Ensure Show Featured Image is checked.

Select Publish to update.

How To Enable Featured Images On Astra
Select Blog.

Select Single Post.

Ensure the Eye icon next to Featured Image is enabled.

Select Publish to update.
How To Enable Featured Images On Kadence
Select Blog Posts.

Select Single Post Layout.

Ensure the Show Featured Image option is enabled.

Select Publish to update.

How To Enable Featured Image On Your WordPress Blog Post Editor When Using Astra Or Kadence
How To Enable Featured Image On Your Blog Post When Using Astra
Select Edit under the post or page.
Select the Astra Settings tab.

Ensure the Disable Featured Image option is not selected.

If you make a change here, select Update.

How To Enable Featured Images on Your Blog Post When Using Kadence
Select Edit.
Select the Post Settings icon.
Scroll down to the Show Featured Image option.
Ensure this is set to Default or Enable.

After making changes, select Update.

Optimizing Featured Images
Optimize your featured images to ensure they display correctly and look attractive on your site.
Here are some tips to keep in mind:
Use the Correct Size and Resolution
Using the correct size and resolution for your featured images is essential. If they are too small, they may appear pixelated or blurry.
If they are too big, they may take longer to load and not fit in the designated featured image area.
Check your theme’s documentation or settings for the recommended image size and resolution.
If you’re unsure, around 1200 pixels wide should work.
Use the Appropriate File Format
Different file formats are best suited for different types of images.
For example, JPEG is a good choice for photographs, while PNG is better for images with transparent backgrounds.
When saving your images, choose the appropriate file format based on the characteristics of the image.
This will help ensure that your images look their best and load quickly.
Optimize for Loading Speed
Large images can slow down your site, which can be frustrating for users and may affect your search engine rankings.
You can try compressing your images or using a plugin to optimize images automatically to improve loading speed.
There are several plugins available that can help you optimize your images for faster loading times.
Some popular options include Smush, ShortPixel, and EWWW Image Optimizer.
Use Descriptive and Relevant File Names
When saving your images, use descriptive and relevant file names that reflect the image content.
File names make it easier for search engines to understand what the image is about and may improve your search engine rankings.
For example, instead of naming your image “IMG_1234.jpg”, use a descriptive name like “blue-widgets.jpg” if the image is of blue widgets.
Conclusion
In conclusion, if you’re experiencing issues with your featured images not showing up on your homepage, don’t worry!
You can quickly troubleshoot and resolve the issue by following the easy steps outlined in my checklist.
First and foremost, ensure you have assigned a featured image to each of your blog posts.
This step can often be overlooked but is critical to ensuring your images appear on your homepage.
Next, review the global settings for your theme on the customizer. Make sure that the “Show the Featured Image” option is activated.
If not, this could be why your featured images aren’t appearing.
By taking these simple steps, you can ensure that your featured images display correctly on your blog.
Your readers will appreciate the added visual appeal, making your content more engaging and shareable.
Do you know how to check and update the PHP version for your website when hosting with HostGator?
Check out our easy-to-follow ‘Update Hostgator PHP Version Tutorial‘ to learn more.
Need Help With Your Website?
With over four years of experience using WordPress, I can help you solve issues you may have.
My experience includes creating websites using WordPress, hosting, domains, DNS, SSL, Google Cloud, CloudFlare CDN, and site migrations.
Feel free to contact me via email at [email protected], use this contact form, or message me on the Line application.

Leave a Reply